There’s a lot of hype at the moment about AI in general, and chatbot’s being the next big “app market”. Reality is the tech is still very immature and there are not a lot of use cases where the chatbot workflow is a better UX than simple point and click with a well defined menu and information architecture.
FAQ’s are an important corner of the customer support sector and is one area where they may have use so I decided to test out Microsoft’s bot service, which is still in preview mode: https://azure.microsoft.com/en-us/services/bot-service/
I created an FAQ chatbot for one of my own products as a practical test, which you can see running live here: http://www.harpninja.com/wp/faqhelp/
As you can see from the image there’s quite a bit to it, architecturally and technology wise, with a number of different services from NLU (Natural Language Understanding) to the bot development to connecting various user touchpoint services. There are a number of different types of bots you can implement and an FAQ bot is best implemented using another service they have called https://qnamaker.ai
Overall it’s a pretty nice developer workflow considering the different services they have hooked up to make the development and deployment a relatively painless experience. This FAQ chatbot is using their inbuilt web chat preview which made it a snap to integrate into WordPress without having to code up a plugin. The bot has also been deployed to Skype, Slack, and Facebook Messenger.
There’s a lot of different options for developing chatbots, which this article gives a great overview of: https://www.oreilly.com/ideas/bots-what-you-need-to-know , but I would definitely recommend Microsoft (the new Apple!).
I’m familiar with Data Science, data mining, and data visualization and have been working with a few tools, from RapidMiner to cloud based ML platforms such as IBM Watson, Microsoft, Amazon, & Google.
Data Scope Interfaces
Erik opened my eyes to some new ways of looking at the problem of constructing visualization and analysis tools in an increasingly data saturated world. He introduced the concept of Data Scopes, interactive tools for exploring multidimensional data and inter-relationships using the human visual system as the pattern recognition engine. The data can be pre-processed with Machine Learning to slice, dice, connect and categorize to provide a rich content source for the visual interfaces to explore.
So I decided to do some prototyping and see what I could come up with to explore the Data Scope concept at a basic level. There are a wealth of great open source Javascript libraries for visualization around. I focused on DC.js which is a mashup of the well known D3 library for manipulating data documents and Crossfilter, a multivariate dataset explorer library originally released by Square.
As anyone who has worked with data science will tell you, massaging the data into shape is usually the most time consuming and painful part of the process. Garbage in, Garbage out as the old computer saying goes! I actually asked Erik in the Q&A what his processes were to clean the data, and he made the interesting comment that Data Scopes are also useful for rapidly detecting anomalous data. That’s why this earthquake data set is a great example because it has lots of missing data, in addition to lots of useful data.
Have a play with the Data Explorer below and see what patterns and relationships you can detect. See if you can spot where the data is missing, and see if you can spot where data looks a little strange (usually due to inaccuracy of records going back in time I suspect). It was a fun project and I learned a lot which I hope to apply moving forward to some more explorations.
Disclaimer: I did a small amount data manipulation for the purposes of this example . Many of the largest & oldest quake events are missing data in key categories, so I added a baseline 10000 to total injured in order to get some to display in the bubble chart.
Internationalization: Internationalization is the design and development of a product, application or document content that enables easy localization for target audiences that vary in culture, region, or language. Localization: Localization refers to the adaptation of a product, application or document content to meet the language, cultural and other requirements of a specific target market (a locale).
ref: W3C Localization vs. Internationalization
Why Internationalize your website or webapp?
If your target market(s) speak more than one language you need to consider how to internationalize (and localize) your meteor app.
The official meteor guide briefly explains some internationalization methods.
I looked at a few of the different internationalization solutions and for one reason or another found them overly complex to implement. I wanted the simplest possible solution that made the code also easy to read. At this point in time Universe:i18n seems to do that. While the official meteor guide mentions Universe:i18n I felt it lacked some detail needed to get started, hence this short tutorial.
To demonstrate internationalization in the context of a working app I’m going to walk you through you a basic internationalization of the excellent Meteor Chef boilerplate Base project. The Base project is great because it follows the meteor structure guidelines, as well as implements React as the UI with React Router. We’ll refer to this as MC Base through the rest of this tutorial.
Here’s what MC Base looks like out of the box:
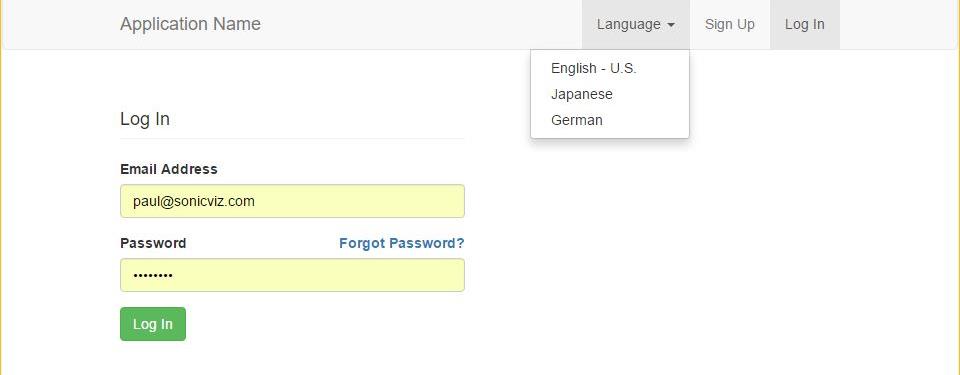
MC Base Internationalized, with English selected:
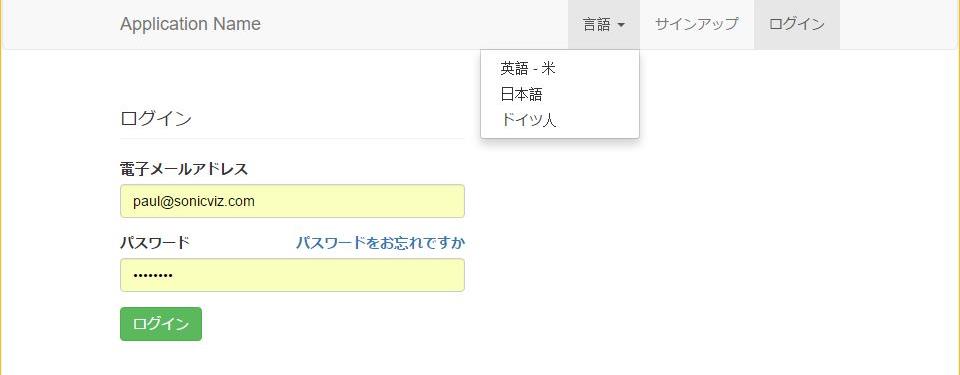
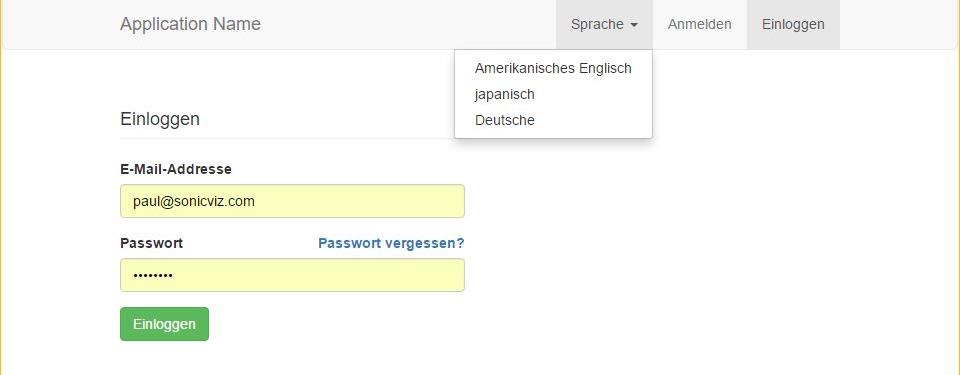
MC Base Internationalized, with Japanese selected:
MC Base Internationalized, with German selected:
The Process
So, how do we do it?
Step 1
The source code for this tutorial is based on MC Base 4.7.0 and is available on github here. I’m using SourceTree and GitFlow, so there are two branches in this repo:
master – containing the original MC Base 4.7.0 codebase
develop – containing the working internationalized codebase
Familiarize yourself with the MC Base file structure, which is explained here. The rest of the tutorial assumes you’re adding it to the original MC Base in master branch, but you can also just read through it to understand where to look in the develop branch.
Step 2
Add Universe:i18n to your meteor project with “meteor add universe:i18n“.
Step 3
Read about the universe:i18n translation file formats and options here.
Decide which languages you want to implement, then create the JSON files for them and add them to the meteor project in a directory where they can be accessed by the client and the server.
For the purposes of this tutorial we have created three JSON language files that have a namespace of “common” and they have been added to directory “both/i18n”:
The strings are simply accessed as keys by references such as namespace.JSONelement1.JSONelement2 etc. For example, common.navbar.Signup or common.loginform.Email , where common is the namespace 2nd line of the JSON files. You don’t have to have a namespace, but for more complex localization efforts it may be needed so this demonstrates how to use it.
Step 4
Identify the files you need to change to add the internationalization dropdown. MC Base demonstrates public routing and authenticated routing. If you wish to have the localization menu available on the navbar of both routes you will need to implement it on both.
imports/ui/components/public-navigation.js
imports/ui/components/authenticated-navigation.js
Identify any other files that need to be localized. Since we are also localizing the login and signup pages you will need to modify them as well.
imports/ui/pages/login.js
imports/ui/pages/signup.js
Step 5
Open the file imports/ui/components/public-navigation.js and modify it as follows:
You need to import universe:i18n, so add the following after the main imports in the file:
import i18n from 'meteor/universe:i18n';
You need to add a dropdown menu with menu items, and as these are not in the original import you need to add them:
import { MenuItem, Nav, NavDropdown, NavItem } from 'react-bootstrap';
There’s a couple of ways to translate strings with Universe:i18n, but since we’re using React it comes with a very neat inline react component which you can read about here. All you need to do is create an instance of the react translation component and feed it the keys from our translation files.
//instance of translate component with top-level context const T = i18n.createComponent();
The following code from public-navigation.js shows how that is implemented on the main navigation bar.
Note the language switching is done simply by changing the locale eg: “i18n.setLocale(‘ja-JP’);” and everything else is automatically handled by the string references in the NavItems to the JSON language files.
Modify the imports/ui/components/authenticated-navigation.js file to reflect the same structure as Step 5. Note it has two extra menu items (index, documents) for the authenticated route.