Quapp Quickstart SaaS Dev Kit with Quasar and Appwrite

Quapp Quickstart SaaS Dev Kit with Quasar and Appwrite

Transform Your SaaS Development with Quapp Quickstart SaaS Dev Kit

In the fast-paced world of software development, finding the right tools to build secure, robust, and scalable SaaS applications can be a daunting task. Enter the Quickstart SaaS Dev Kit, a powerful combination of Quasar and Appwrite that promises to revolutionize your development process. We’re pleased to announce that the Quapp Quickstart SaaS Dev Kit has just been released and has a live demo available as well. 

Why SaaS?

SaaS (Software as a Service) has become the go-to model for delivering software solutions. It offers numerous benefits, including reduced infrastructure costs, scalability, and easy accessibility. However, developing SaaS applications comes with its own set of challenges, such as complex backend integration, time-consuming deployment, and maintaining multiple codebases.

The Solution: Quickstart SaaS Dev Kit

The Quickstart SaaS Dev Kit is designed to address these challenges head-on. By leveraging the strengths of Quasar and Appwrite, this dev kit provides a comprehensive solution that simplifies the development process and accelerates time-to-market for SaaS applications.

Quasar: The Front-end Powerhouse

Quasar is a front-end framework built on Vue.js that allows developers to create high-performance, responsive, and cross-platform applications. With Quasar, you can write a single codebase that runs seamlessly on web, mobile, and desktop platforms. This not only saves time and effort but also ensures a consistent user experience across all devices.

Appwrite: The Backend Maestro

Appwrite is an open-source Backend-as-a-Service (BaaS) platform that provides a suite of APIs and services to simplify backend development. With Appwrite, you get:

  • Data Management: A scalable and secure database solution.
  • Authentication: Robust authentication methods, including email/password and OAuth.
  • Serverless Functions: The ability to run custom backend code without managing servers.

By integrating Appwrite’s backend services with Quasar’s front-end framework, the Quickstart SaaS Dev Kit offers a seamless development experience.

Overcoming Common Challenges

The Quickstart SaaS Dev Kit addresses several common challenges faced by developers:

  1. Complex Backend Integration: Simplifies the process of connecting front-end and back-end components.
  2. Time-Consuming Deployment: Pre-built templates and components accelerate the deployment process.
  3. Scalability: Ensures that applications can scale effortlessly to meet growing user demands.
  4. Security: Provides a secure foundation for SaaS applications with built-in authentication and data management features.

Conclusion

The Quickstart SaaS Dev Kit with Quasar and Appwrite is a game-changer for SaaS development. It offers a secure, robust, and scalable framework that empowers developers to build modern SaaS applications with confidence and efficiency. Whether you’re a seasoned developer or just starting out, this dev kit is your ticket to transforming your SaaS development process.

Ready to take your SaaS development to the next level? Explore the Quickstart SaaS Dev Kit and unlock the full potential of your applications with and

Written By

AI Short Video Generators: Streamlining Content Creation

The Rise of AI-Generated Video Shorts: Streamlining Content Creation

In the ever-evolving landscape of digital content creation, the emergence of AI-powered video generation has revolutionized the way we approach video production. As the demand for video content continues to soar, the traditional three-stage process of pre-production, production, and post-production has been significantly impacted by the integration of artificial intelligence (AI) technologies.

Traditionally, video production has been a labor-intensive and time-consuming endeavor, involving meticulous planning, filming, and editing. However, the introduction of AI-powered tools has the potential to streamline this process, making it more efficient and accessible to a wider range of creators.

The pre-production stage is the planning and design phase, where ideas are conceptualized and developed. In this stage, AI can assist creators by automating tasks such as scriptwriting, storyboarding, and even generating visual concepts (Gopoint, 2022). AI-powered tools can help streamline the ideation process, allowing creators to focus on the creative aspects of their projects.

The production stage involves the actual filming and capturing of the video content. While AI’s role in this stage may be more limited, advancements in AI-powered cameras and real-time decision-making tools can enhance the efficiency and quality of the production process (Lumira Studio, 2023).

Post-Production

The post-production stage is where the magic happens. This is where the footage is edited, color-corrected, and polished. AI-driven video editing tools have revolutionized this stage, automating repetitive tasks such as scene detection, shot selection, and color grading (Vitrina.ai, 2023). This allows editors to focus on the creative aspects of storytelling and enhancing the overall quality of the final product.

Streamlining Content Creation with AI

The integration of AI into the video production process has significantly streamlined the content creation workflow. AI-powered tools can assist creators in various ways, from generating ideas and scripts to automating post-production tasks (Wistia, 2023).

One of the most notable examples is the integration of Veo into YouTube Shorts. This AI model allows creators to generate high-quality, 1080p resolution videos that can exceed a minute in length, in a wide range of cinematic and visual styles (DeepMind, 2024). This capability, combined with the ability to quickly generate backgrounds and six-second clips, empowers creators to produce more impressive and engaging short-form content (TechCrunch, 2024).

The potential of AI-generated video shorts is evident in the examples provided below, generated with a prototype AI Video Short system I have created:

  1. Latest Research on Sulfites and Potential Health Effects (2024): This short video, generated using AI, highlights the latest research on the potential health effects of sulfites, a common food preservative. The video’s concise format and informative content make it an effective way to educate viewers on this important topic.
  2. Labellens Ingredient Focus: Azodicarbonamide (ADA) Potential Health Effects: This AI-generated short video delves into the potential health effects of azodicarbonamide (ADA), a food additive often used in processed foods. The clear and visually appealing presentation makes the information easily digestible for viewers.
  3. SafeGuardianAI – Decentralized AI-Driven Disaster Response Assistant: This 42-second educational marketing short showcases how AI can be used to create engaging and informative content for a specific audience, in this case, promoting a decentralized AI-driven disaster response assistant.
  4. Drone Report – Emerging Drone Threats: This 34-second educational channel short video demonstrates how AI can be leveraged to create concise and visually striking content that informs viewers about emerging drone threats.

These examples illustrate the versatility of AI-generated video shorts, which can be used for a wide range of purposes, from educational content to marketing and promotional materials.

Technical Breakdown of an AI Video Short Generation System

I’ll be going into more technical detail in a series of upcoming blog posts, but essentially the system works as follows:

  1. Create a prompt: add some context to act as the seed for the AI script generation process
  2. Feed the prompt to a generative AI system: receive a formatted structure broken into ~6 short 1-line descriptive scene elements, with associated image descriptions
  3. Feed the image descriptions into an AI Image generator: use some parameters to guide the overall graphic style of the video: realistic, cinematic, line art, comic book++
  4. Feed the associated 1-line descriptive scene elements into a text to speech AI system: with associated narration gender and style and retrieve the audio
  5. If you wish, animate the still images to the length of the script lines with a parallax shader with parameters to define the animate style you would like. Alternatively, you can just create still image clips.
  6. Create a complete video: with all the clips and video transition effects between them. There are many different types here to vary the visual interest. In this stage you can also overlay a logo/watermark at different screen positions, as well as add an optional branding end scene with contact details. 
  7. Add the audio narration to the previous steps video: and then feed that into a captioning system (if you want captions!) that will create animated captions with custom font, colors, and position while also highlighting the current word being spoken on the video narration timeline.
  8. Mix in the background music: not too loud to conflict with the narration, and not too soft you can’t get a sense of it for atmosphere.
  9. Output the created video: upload to the various social networks for distribution

Latest Research on Sulfites and Potential Health Effects (2024) demonstrates all these options being used, but you can combine any combination of them to suit the message you want to support.

The video can be generated with a local application, or through a SaaS based cloud-based system using a series of microservice API’s. I’ve currently developed the desktop generation system and have completed implementing the video captioning system as a FastAPI microservice running from Google Cloud.

I’ll be going into more details into this and other components of the ai video short generation pipeline in upcoming technical blog posts.

The integration of AI in the video production process has the potential to revolutionize the way we create and consume video content. By streamlining the various stages of video production, AI-powered tools can help content creators save time, reduce costs, and increase the overall quality and effectiveness of their videos.

As the technology continues to evolve, the future of AI-generated video shorts is promising, with the potential to make video creation more accessible and democratized than ever before. By embracing these advancements, content creators can unlock new possibilities and deliver engaging, informative, and visually captivating video experiences to their audiences.

Written By

The Power of Repetition and Interleaved Learning in MSFS

Today I want to talk about how repetition and interleaved learning can help you master the sim piloting skills of take offs and landings using MSFS.

Repetition is the act of doing something over and over again until it becomes automatic. Interleaved learning is the practice of switching between different topics or skills in a random or varied order. Both of these methods have been shown to improve retention and transfer of knowledge and skills in various domains, including aviation.

Why are repetition and interleaved learning important for take offs and landings?

Well, these are two of the most critical and challenging phases of flight, and they require a lot of coordination, precision, and situational awareness. They also vary depending on the type of aircraft, the weather conditions, the airport layout, and the traffic situation. Therefore, it is not enough to just learn how to do a take off or a landing once and then forget about it. You need to practice them frequently and in different scenarios to build your confidence and competence.

MSFS is a realistic and immersive flight simulator that allows you to fly anywhere in the world with any aircraft you want. You can also customize the weather, the time of day, the traffic, and the failures to create realistic and challenging situations. MSFS addons like location manager and aircraft manager provide features that let you save your favorite locations and aircraft settings for easy access.

For example, let’s say you want to practice take offs and landings at KLAX Los Angeles International Airport in California, USA. You can use the location manager to save this airport as one of your favorites, and it will automatically show you how many runways and parking spots are available, as well as the ILS frequencies if any. You can also use the aircraft manager to save your favorite aircraft types, livery, fuel load, weight and balance, etc.

KLAX ILS Training with Location Manager

KLAX ILS Training with Location Manager

Then, you can use the location manager toolbar in fly mode to quickly switch between different runways and parking spots without having to go back to the main menu. This way, you can practice take offs and landings from different directions and distances, with different wind speeds and directions, with different traffic patterns, etc. You can also use the aircraft manager weight and balance toolbar additions to change your aircraft settings on the fly, such as changing the fuel, passenger, or cargo load.

Changing Weight and Balance presets

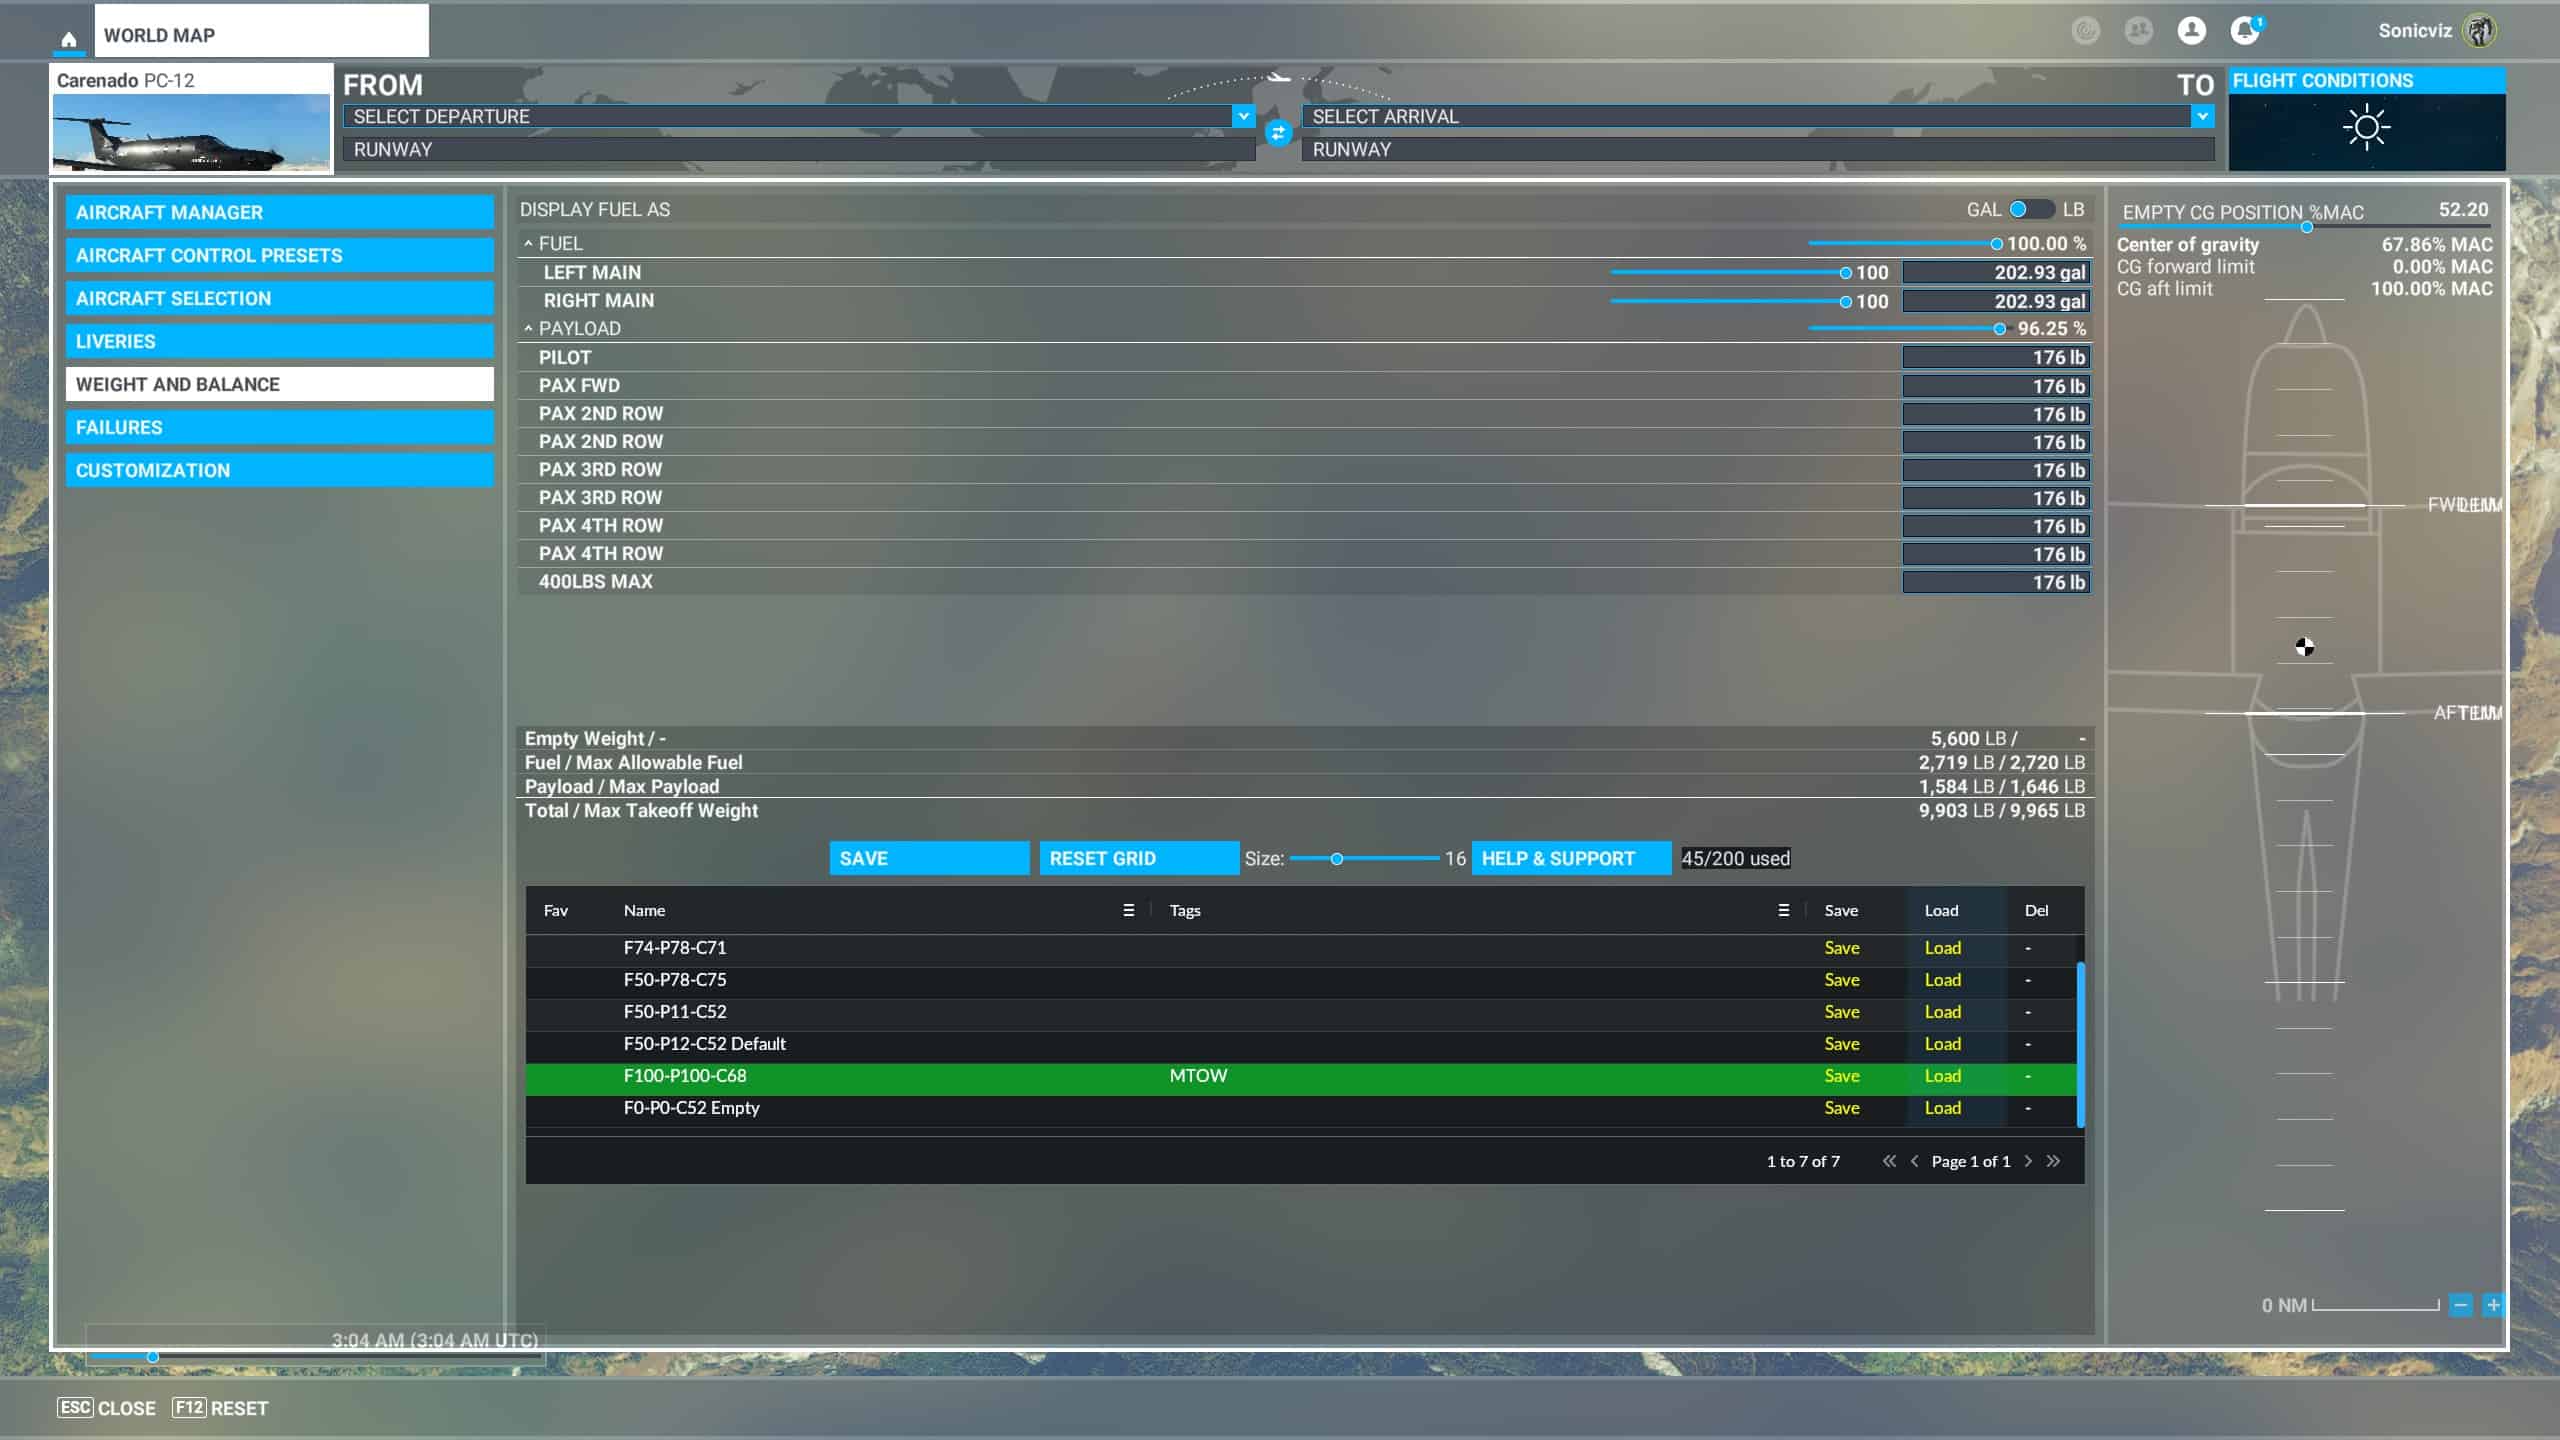
Changing Weight and Balance presets for quick aircraft reconfiguration

By doing this, you are applying repetition and interleaved learning principles to your simulation based training. You are repeating the same skill (take off or landing) multiple times until it becomes second nature. You are also interleaving different variables (runway, parking spot, weather, time of day/night, position, distance, bearing, height, speed ) to make your practice more varied and challenging. This will help you improve your memory, adaptability, and problem-solving skills. You can also complelty randomise all these variables to really test your skills.

If you want to see how this works in action, check out this video where I demonstrate how to use the location manager and aircraft manager features in MSFS. I also show you some examples of how I practice take offs and landings at Bora Bora Airport in French Polynesia using these features, in addition to pointing out other features using Lukla (height AGL estimation) and KLAX (ILS training).

You can use it for all sorts of scenario based training:

  • Take offs
  • Take off emergency procedures
  • Landings
  • Go around
  • Landing emergency procedures
  • Varied landing approaches
  • ILS familiarisation and training
  • Whatever you can come up with!

To get the best out of Location Manager it’s best to watch the above video, and also refer to the extensive notes in the Tips section: How to best use Location Manager 

Future improvements to this process could involve things like:

  • Improved failure triggering in take off/landing (currently set via the failure menu before flight)
  • Traffic issues impacting the pattern sequence
  • ATC instructions
  • [insert here]

Will see how things progress! I hope you enjoyed this blog post and learned something new.

Feel free to send comments and feeback via the Contact Form, I’d love to hear from you.

Until next time, happy flying!.

Pin It on Pinterest